As we have already published several articles about the Solana NFT ecosystem, including promising projects and collections, we deemed it useful to explain the NFT generation in more detail, along with the installation of the Candy Machine on Solana.
Note that this article will be updated after each major change in the described process; do not hesitate to reach out through our social media account if you spot any gaps. Additionally, this tutorial assumes the user is working on Windows and might not fully apply to other operating systems such as Mac OS or Linux.
Required pieces of software
Before beginning this tutorial, several pieces of software must be installed on your computer. Be sure to download the versions corresponding to your operating system.
- Visual Studio Code (code editor): https://code.visualstudio.com/download
- Node.js: https://nodejs.org/en/download/
How to generate NFTs (pictures) on Solana
First, we will show you how to generate NFTs (previously created and illustrated) and then feed them into the Candy Machine to be minted. Ensure all steps are followed carefully.
Install the “Hashlips” file
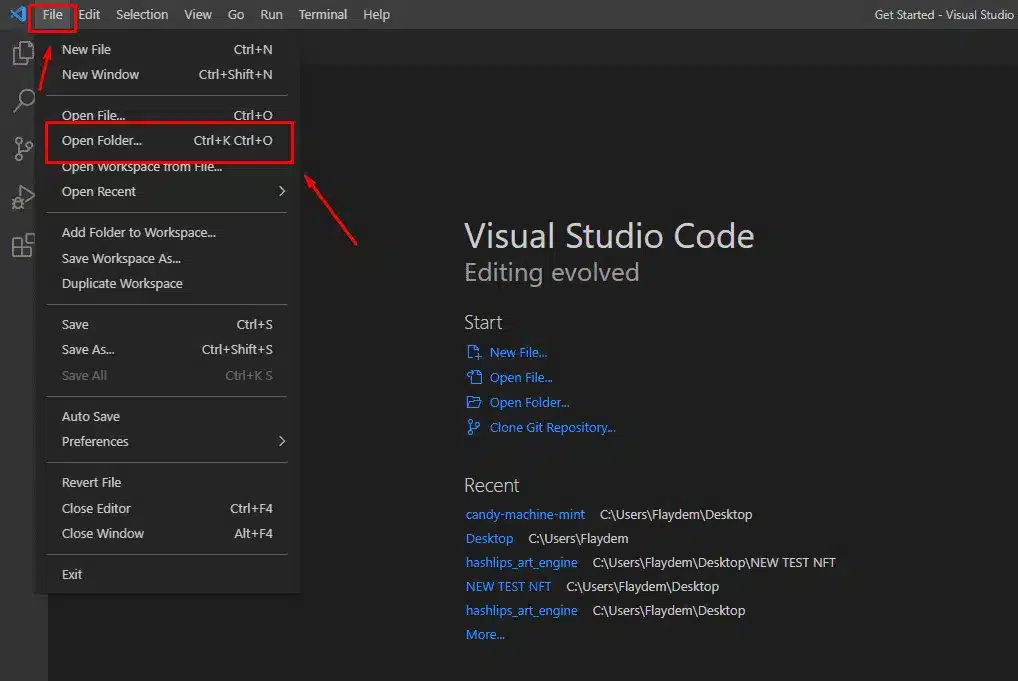
- First, open your newly installed Visual Studio Code software. Click on “File” and “Open Folder”.
- Click on “Desktop” and on “Select folder”.
- Open a new terminal by clicking on “Terminal” and on “New Terminal” or by using the shortcut Ctrl+Shift+ù on your keyboard.
Caution: Be sure to use the “CMD” (Command Prompt) command and not “Powershell”. This applies to all command instructions in this tutorial. To do so, click on the downward arrow on the left-hand side of the terminal and click on “Command Prompt”.

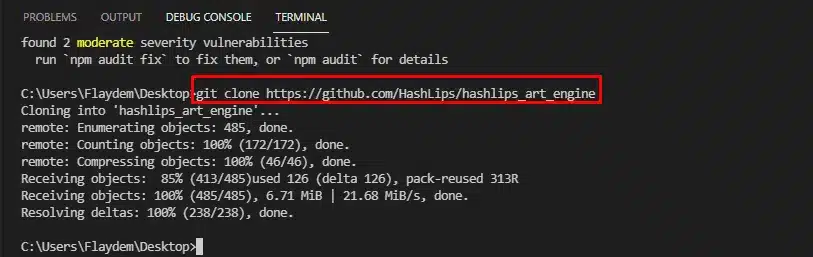
- If “Git” is not yet installed on your computer, enter the following command: npm install git and press the “enter” key.

- Copy the HTTPS link from Github:
https://github.com/HashLips/hashlips_art_engine

- Install the “Hashlips” file on your desktop using the following command: git clone <copied link from Github>
Note that you can install this file directly on Github by choosing the indicated version on the right-hand side of your screen (be sure you choose the latest version). You can then install the “Source Code.zip” on your desktop.
Configure the “Config.js” file
- Once the file is installed, open it up on VSC (Visual Studio Code) by clicking on “File” and “Open Folder”. Select the “hashlips_art_engine” folder.
- You can see the content of the HashLips file (layers, modules, scr, etc.) on the right-hand side of the VSC software. Open a new terminal and set it up as “CMD”, as previously explained.
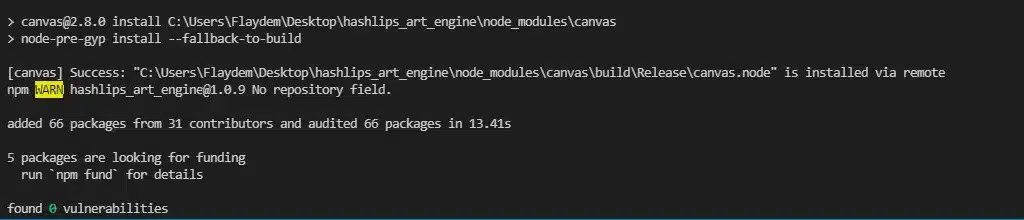
You can now install the “npm” through inserting: npm install
- Click on “SRC” (on the right-hand side of your screen) and on the “Config.js” file. This is where you will set up the parameters of your collection (number of NFTs, name, description, attributes, etc.).
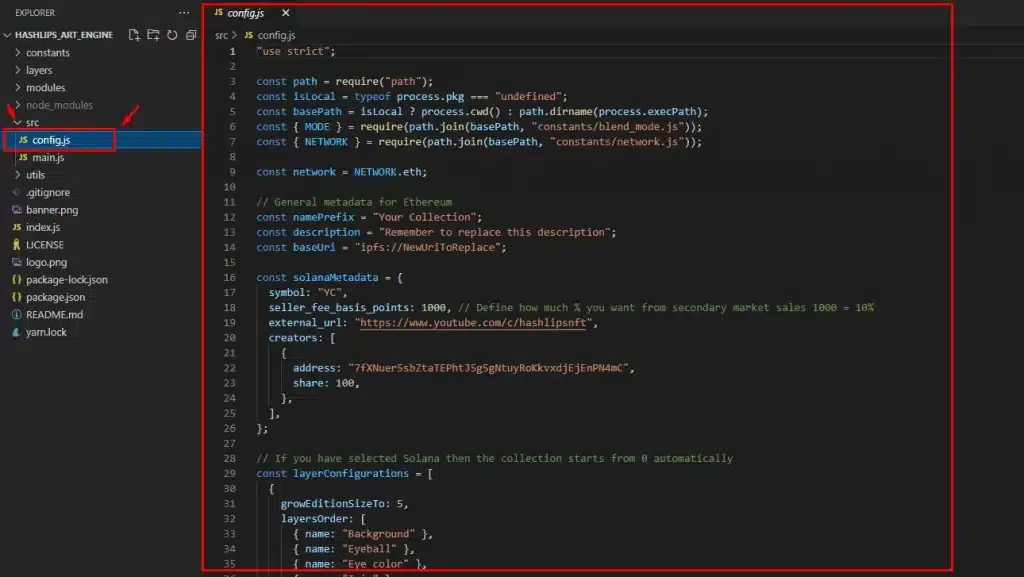
Below is a list of changes you need to perform on the file (use “Ctrl+F” to speed up the process):
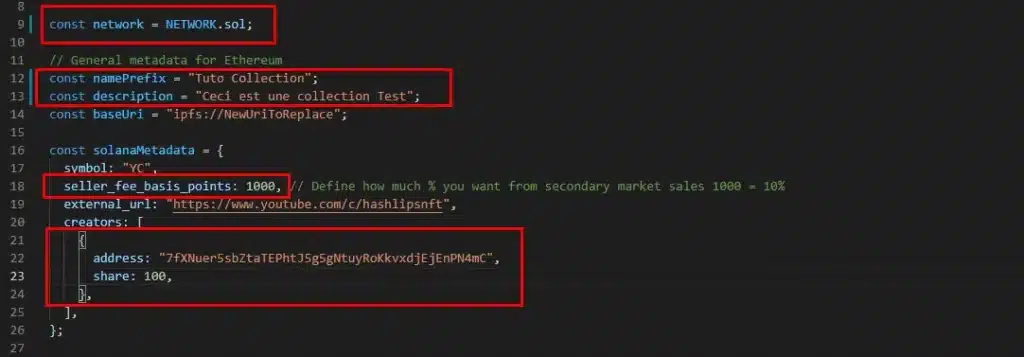
- const network = NETWORK.eth; (for Ethereum) / NETWORK.sol; (for Solana); for the purpose of our example, you need to replace “Const network = NETWORK.eth” with “Const network = NETWORK.sol;”
- const namePrefix = “Your Collection”;: replace “Your Collection” with the name of your NFT collection
- const description = “Remember to replace this description”;: Replace the sentence between quotes with the description of your collection. This is what will appear on Phantom Wallet once the collection is minted
- seller_fee_basis_points: 1000,: Define the fees (which you will receive) that will be charged to buyers for sales on secondary marketplaces (e.g., Solanart, Magic Eden, Alpha.art, etc.). Note that 1000 basis points correspond to 10% (i.e., 500 = 5%, 250 = 2.5%, etc.)
- You must now replace the “creator’s address” with your own to ensure you receive the SOL in your wallet after minting
Caution: If there is more than one creator, be sure that you are copying and pasting directly under the “address: (your address)” and “share: 100”. You need to divide “100” by the number of creators(to ensure an equal distribution of the gains upon minting) and replace all the address fields with the addresses of all creators.
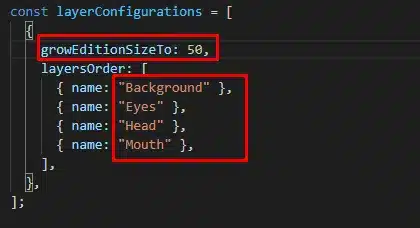
- We can now start configuring your NFTs’ attributes (traits). First, define the number of pictures (NFTs) you wish to generate using “growEditionSizeTo”. For the purpose of the example, we will generate 50 NFTs so this number will be “50”
- Define your NFTs’ attributes by modifying the attributes displayed on the screen. If they include 4 attributes, indicate their “name/category” on the file instead of those already written (e.g., “Background”, “Eyes” or “Head” for hats or other head accessories). If you wish to add more categories, simply add extra lines under the last one using the format: { name: “attribute category name” }
For our example, the file looks as follows:
- In the “hashlips_art_engine” folder, go into “layers” and rename all files to the names of your NFT categories (e.g., background) as shown in your “Config.js” file (see below)
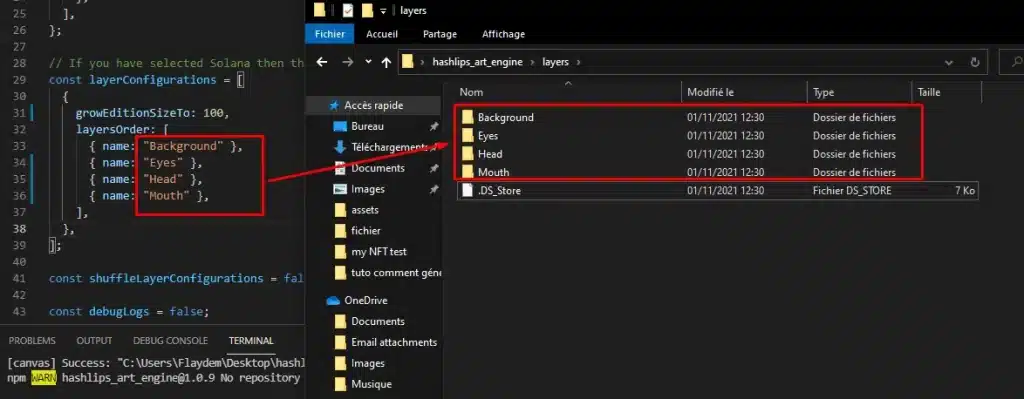
- Delete all initial files from these folders and replace them with your attributes (in .PNG) in the dedicated folders. If not already done, rename ALL attributes from the collection to: “Name of the attribute”#”rarity index” (e.g., Cowboy hat#100). The rarity index must be between 1 and 100
- The default size of an NFT is 512×512. To change it, go into the “const format” section and define the size of your NFT using the “width” and “height” fields
- If your NFTs do not have any background attributes, go into the “const background” section and replace “true” by “false”
NFT generation
Once your “Config.js” file is finalized, you need to generate all NFTs. To do so, enter “node index.js” in the Terminal.
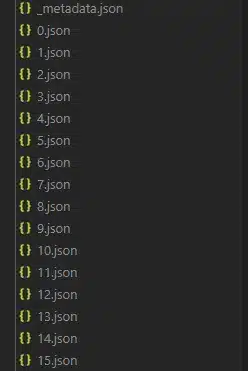
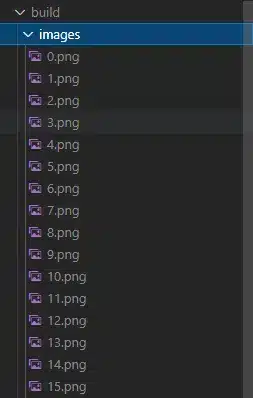
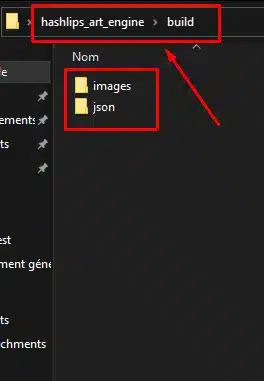
Congratulations, your NFTs are now successfully created! A “build” folder was also generated in your Hashlips folder where all your NFTs and your “metadata.json” are stored.
Minting website creation
Now that your pictures / JSON are generated, we will show you how to create the website where you can mint them. The last step will involve deploying the highly praised “Candy Machine” onto the website and randomly generating all the NFTs.
- First, go through similar steps as in the first part of this tutorial: click on “File”, “Open Folder”, select your “Desktop” and click on “Select folder”
- Open a new terminal by clicking on “Terminal” and “New Terminal”. Again, don’t forget to use the “CMD” command and not “Powershell”
- As “GIT” was already installed through inserting “npm install git”, we will proceed with the next step. If you haven’t installed it yet, do so by inserting the above command in your terminal
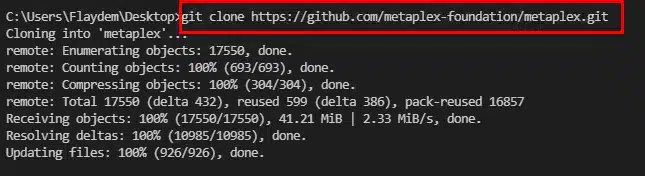
- Install the Metaplex file through inserting: git clone https://github.com/metaplex-foundation/metaplex.git
Should there be a change, the https link is available on the Metaplex github: https://github.com/metaplex-foundation/metaplex
- Once the Metaplex file is installed on your computer, click on “File”, “Open Folder” and select the Metaplex file to open it. Proceed by opening a new terminal on VSC (always in CMD)
- Insert the command: npm install -g ts-node

Solana CLI installation
- You must now install the “Solana Tool Suite” (Solana CLI) on your computer. To do so, click on the following link:
https://docs.solana.com/cli/install-solana-cli-tools and, based on your operating system (Windows, macOS, Linus, etc.), copy the corresponding command.
As this tutorial is performed on a Windows computer, I copy the following command:
curl https://release.solana.com/v1.8.2/solana-install-init-x86_64-pc-windows-msvc.exe –output C:\solana-install-tmp\solana-install-init.exe –create-dirs
However, for reasons I do not understand, the command gives me an error message. To solve it, I replace “curl” by “curl -k” at the start of the prompt.

- Still on the Solana Tools page, insert the following command to install the latest version of Solana and copy it on VSC

- Ensure that Solana is installed by entering: solana –version. If it outputs a version, Solana is correctly installed
- Enter the command: solana config set –url https://api.devnet.solana.com
(Replace “devnet” by “mainnet-beta” if you are using your main wallet).

Creating your wallet
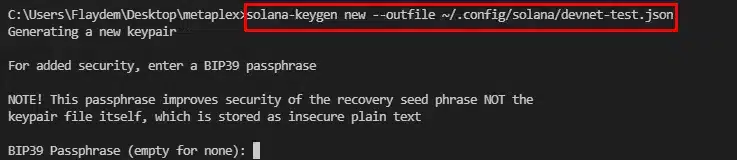
- Create a wallet dedicated to your collection using the command: solana-keygen new –outfile ~/.config/solana/devnet-test.json
- Define your password and confirm it. The password will not be displayed on your screen
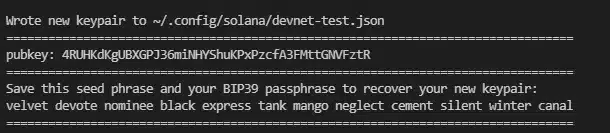
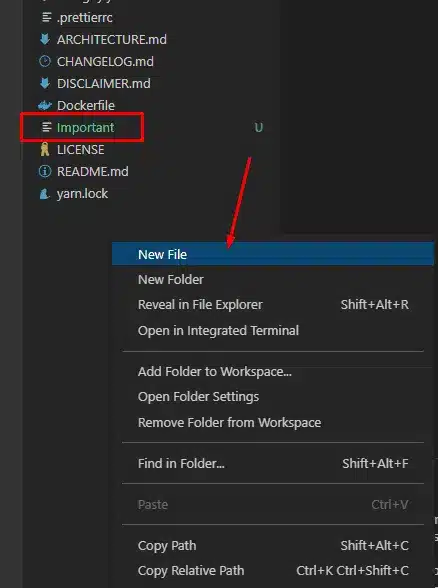
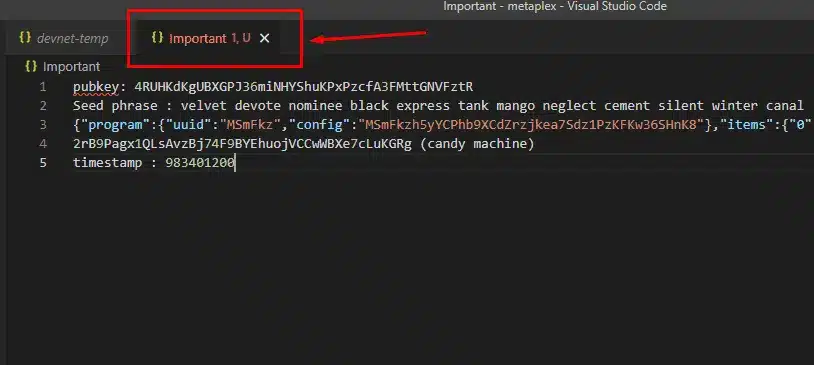
- Safely store the generated data (e.g., pubkey). To do so, go to the right-hand side of your terminal on the Metaplex folder, right click and select “New File”. Rename it “Important”
- Open this folder and store all important information (pubkey, seedphrase) displayed on your terminal
- Add SOL to your balance using: solana airdrop (number of SOL you wish to receive). Note that this only works in Devnet. On the mainnet, you must use your own wallet (e.g., Phantom) to send SOL
Check your balance using: solana balance

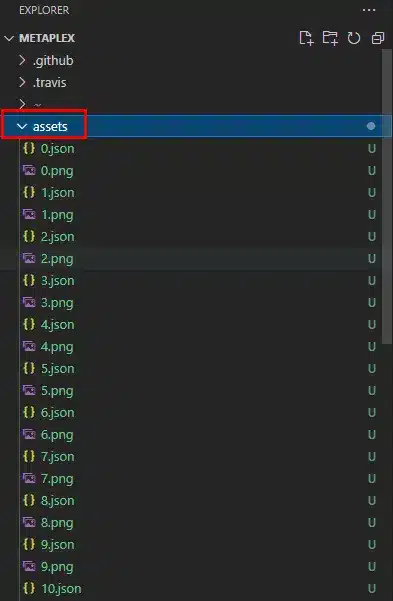
- Create a new folder named “assets” (right click / New Folder) where you can store all your images (.PNG) and your previously generated JSON files. The latter are available in your “Hashlips” folder on your desktop
- Enter the command: cd js
Enter the command: yarn build
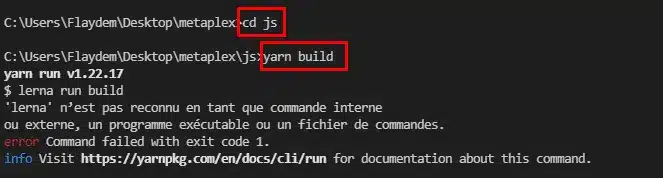
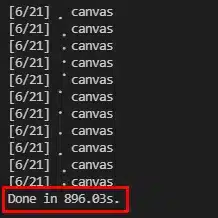
- Ensure you are in the “js” folder. If you are not in it, re-enter the command “cd js”. Then, enter the command: yarn install
The installation should take between 10 and 20 minutes. The final output should read “Done in (installation duration in seconds)”.
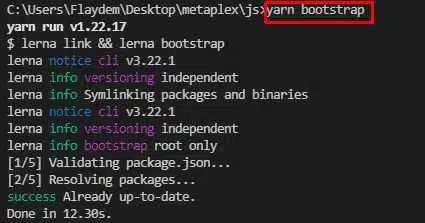
- Enter the command: yarn bootstrap
Candy Machine installation
As the minting website is now set up, we can proceed with installing the Candy Machine.
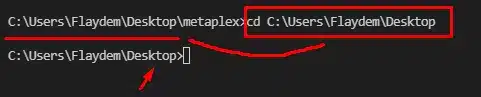
- First, go back into the Metaplex folder using the command: cd (copy the part before “js” and paste it after “cd” – see picture)

- Download the Candy Machine using the command: ts-node js/packages/cli/src/candy-machine-cli.ts upload ./assets –env devnet –keypair ~/.config/solana/devnet-test.json
(Similar to previously, replace “devnet” by “mainnet-beta” if this is not a test.)

- Copy your “wallet public key” and “candy machine with publickey” (see red outline on the picture above) and paste it into your “Important” file as they will be required later on
- Following the installation of the Candy Machine, a “.cache” file was created in your Metaplex folder. Open it and open the “devnet-temp” located inside it
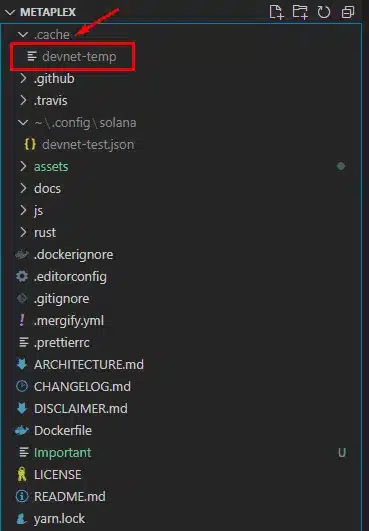
- In this file, you will see a long line of code. Copy it and save it in your “Important” file
- Create your Candy Machine and define the “mint price” of your NFTs (1 = 1 SOL, etc.) using the command:
ts-node js/packages/cli/src/candy-machine-cli.ts create_candy_machine ./assets –env devnet –keypair ~/.config/solana/devnet-test.json 1
(Replace “1” by your mint price)
- Save your generated “candy machine pubkey” in your “Important” file
- Set up your minting date using:
ts-node js/packages/cli/src/candy-machine-cli.ts update_candy_machine –keypair ~/.config/solana/devnet-test.json –date ‘3 Nov 2021 00:00:00 GMT’
Replace “3 Nov 2021 00:00:00 GMT” by the current date and the local time (e.g., GMT, PST) of your location. Note that for the purpose of the tutorial, we used a past date so that our NFTs can be directly minted.

- Copy the code displayed on the right-hand side of “– updated startDate timestamp :” (see red outline on the picture above) and save it on your “Important” file
- Go back into your desktop using: cd (copy the part before “metaplex” and paste it after “cd” – see picture below)
- Install the “Candy Machine Mint” folder using the command: git clone https://github.com/exiled-apes/candy-machine-mint.git
Should there be any change, use the link https://github.com/exiled-apes/candy-machine-mint to check the command.

- As the folder is now installed on your computer, open it by clicking on “Folder”, “Open Folder” and selecting “candy-machine-mint”
- Open a new terminal (still in CMD) and enter the command: yarn install

- Enter the command: yarn build
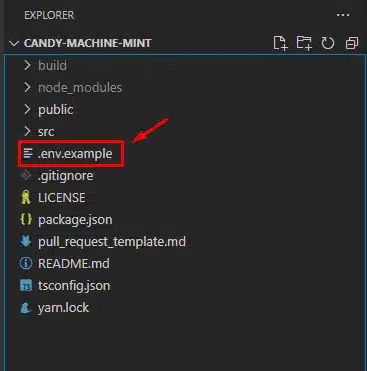
- Rename the “.env.example” file: “.env”

- You will now need the information stored in your “Important” file
To get this information, open a second VSC window without closing the initial one (right click on the VSC icon on the taskbar and click on “New Window”), re-open your “metaplex” folder and open your “Important” file.
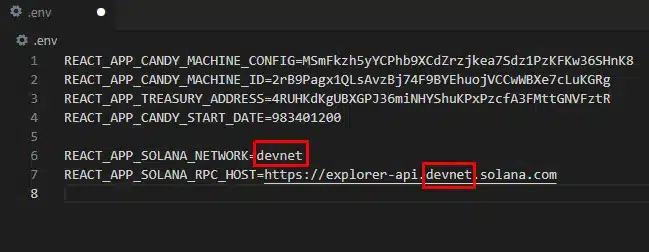
- Import all information from your “Important” file into the “.env” file and replace “__PLACEHOLDER__” by:
- 1 – REACT_APP_CANDY_MACHINE_CONFIG= your “Candy Machine with Publickey“
- 2 – REACT_APP_CANDY_MACHINE_ID= your “Candy Machine Pubkey“
- 3 – REACT_APP_TREASURY_ADDRESS= your “Pubkey“
- 4 – REACT_APP_CANDY_START_DATE= your “Timestamp” (code associated to your minting date)
For our example, this leads to the result below:
- 1 – REACT_APP_CANDY_MACHINE_CONFIG= your “Candy Machine with Publickey“
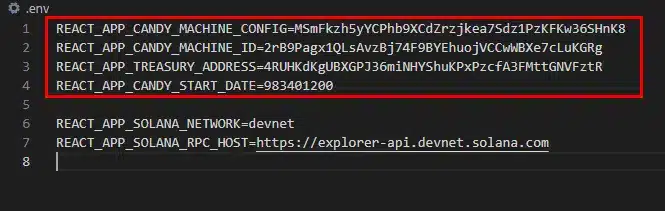
Note that if you wish to reproduce this tutorial on your “mainnet”, you need to replace “devnet” by “mainnet-beta” in Lines 6 and 7.
Publishing your Candy Machine
- Enter the command: yarn start
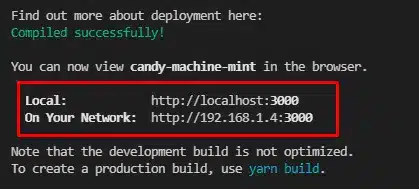
Congratulations, your Candy Machine was successfully published. You can now go on your minting website (assuming it is a test) to mint your NFTs.
You simply need to click on the “Local” link that was created: http://localhost:3000
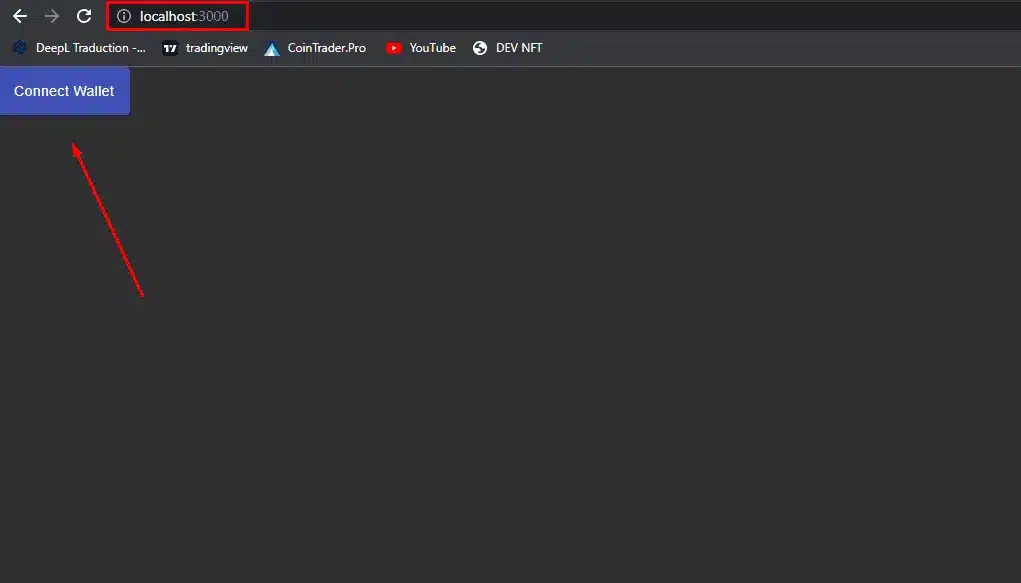
Connect your wallet and click on “Mint”. Ensure that you hold enough SOL.
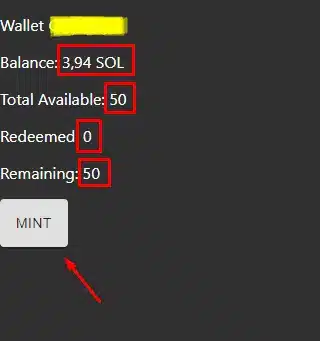
Last but not least, you can discover your NFTs in your wallet (with all their attributes). All the displayed data (e.g., balance, remaining, etc.) will be updated after each mint.
Recommended YouTube videos
Here are a few videos which may come in handy to generate NFTs and install the Candy Machine:
- Creating your “Minting Website” + Candy Machine 1: https://www.youtube.com/watch?v=4LLx7SMAOag&t=1s
- Creating your “Minting Website” + Candy Machine 2: https://www.youtube.com/watch?v=35RO0lAEIxE&t=5s
- Generating your NFTs: https://www.youtube.com/watch?v=lFDpBmoD62A
Error messages and how to solve them
As a rule of thumb, each case is different and we cannot solve all errors you might get. Thus, we recommend that you leverage the “Metaplex” Discord server where many members (e.g., developers) can help you resolve your issues FOR FREE.