Table of Contents
- What you should know before transferring your cryptocurrencies from an exchange to a wallet
- Why transfer your cryptocurrencies from an exchange to a wallet / another exchange?
- Transfer your crypto assets from Coinbase to another exchange such as Binance
- Transfer your crypto assets from an exchange to a Ledger wallet
- Transfer your Solana (SOL) by using a Google Chrome extension as a wallet
What you should know before transferring your cryptocurrencies from an exchange to a wallet
Here’s a bit of vocabulary before we get started, especially for those who are just discovering crypto, so you can easily grasp the content of this article:
An Exchange: an exchange (or exchange platform) is a platform where you can buy & sell different cryptocurrencies, for example: Coinbase, Binance, Kraken, or FTX…
A Wallet: a wallet is an online application allowing you to send, receive or exchange cryptocurrencies.
Wallets exist in various forms: websites, mobile applications, or hardware wallets such as Ledger or Trezor that will enable you to store your cryptocurrencies with an additional layer of security through the use of a physical object that you will connect to the internet only when you need to, for example when you send your cryptocurrencies. This protects you from hackers and I highly suggest you purchase one if you own large amounts of crypto.
Why transfer your cryptocurrencies from an exchange to a wallet / another exchange?
For several reasons:
- Secure your crypto assets: if your cryptocurrencies are held on an exchange platform, your cryptocurrencies don’t really belong to you, they belong to the exchange. Suppose that same exchange were hacked, you would be at risk of losing your cryptocurrencies and there is no guarantee that you would be reimbursed, even partly. This is not cool and despite the low probability of this happening, it can definitely happen.
- Saving money: if you enjoy buying and selling crypto profitably, you are most likely aware that the exchange platform charges a fee on each transaction. Many of you started their crypto journey by purchasing cryptocurrencies on Coinbase or Kraken, however these platforms charge very high fees in comparison to other platforms such as Binance or KuCoin. We’re talking about ~0,1% of transaction fees on KuCoin or Binance compared to ~0,2% and even up to 0,5% on Kraken and Coinbase. This may not seem like a lot, but it is actually HUGE if you consider that for an entire year of trading!
- More options: some exchange platforms may offer to trade cryptocurrencies / tokens that others don’t. You will notice different options between KuCoin and Binance, it could therefore be interesting to have several accounts in order to expose yourself more broadly.
French citizens, be careful: each account registered abroad needs to be declared to the French government in the annual income tax declaration even if you haven’t sold a single cryptocurrency or have any amount of money on the platform, the French state wants to know! (I wrote this article in May 2021 and did it by using this tutorial).
Transfer your crypto assets from Coinbase to another exchange such as Binance
To transfer your cryptocurrencies from Coinbase to Binance or KuCoin connect to your Coinbase account and click on the SEND / RECEIVE button in the top right-hand corner of the website:
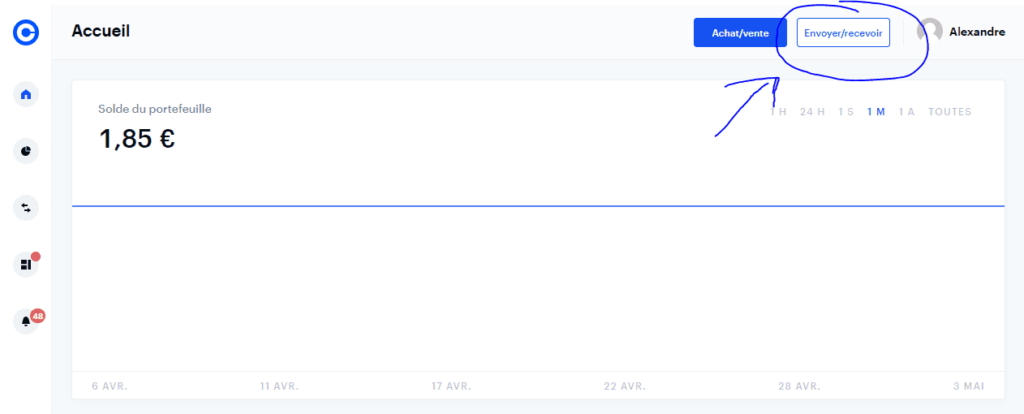
A new window will appear, select which currency you want to receive, in my case Ethereum and this will show up:
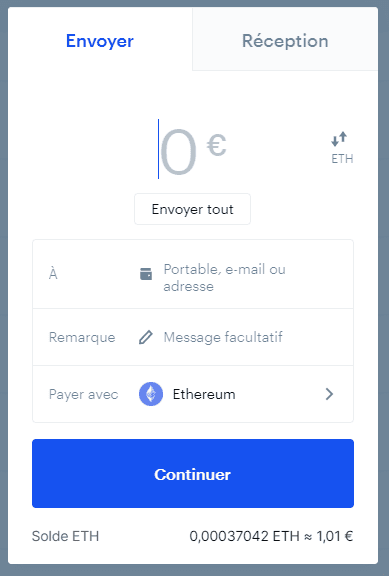
You input the sum in euros that you want to send (I know it sounds weird, but they ask for the amount in euros and not Ethereum) and then you can click on SEND ALL if you want to send all at once.
In “optional message” you can write: transfer of Ethereum from Coinbase to Binance for example – use it as a personal notepad.
Generate a receiving address to transfer your cryptocurrency from one exchange to another
What we need is the receiving address for the cryptocurrency that we want to receive (in our case Ethereum), which we will generate from the Binance dashboard. The same applies regardless of the exchange you’re using: KuCoin, FTX, Huobi, etc.
Links to the dashboard for easy access:
On the Binance dashboard, for example, click on Deposit to access this page:
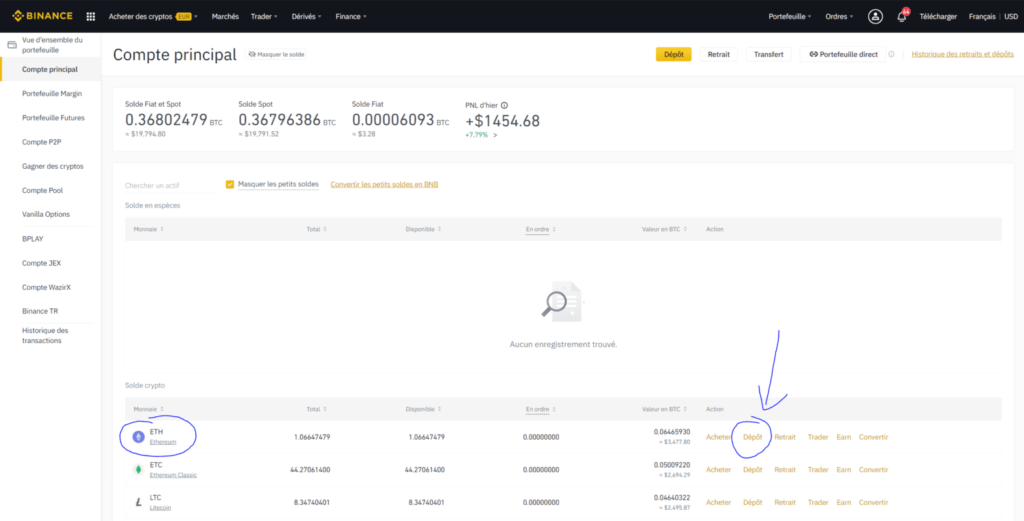
You should see a page like this one with your Ethereum address. You’ll notice a small “ERC20”, highlighted in yellow, right above the address. This means that it’s an Ethereum (ERC20) receiving address, which is important, because a cryptocurrency may exist on different networks, such as BEP20 for the Binance Smart Chain (BSC), related to Binance Coin (BNB).
If you get the network wrong your assets will not go to the right destination and you are at risk of losing your funds forever, therefore, make sure to select the ERC20 network in Ethereum’s case!
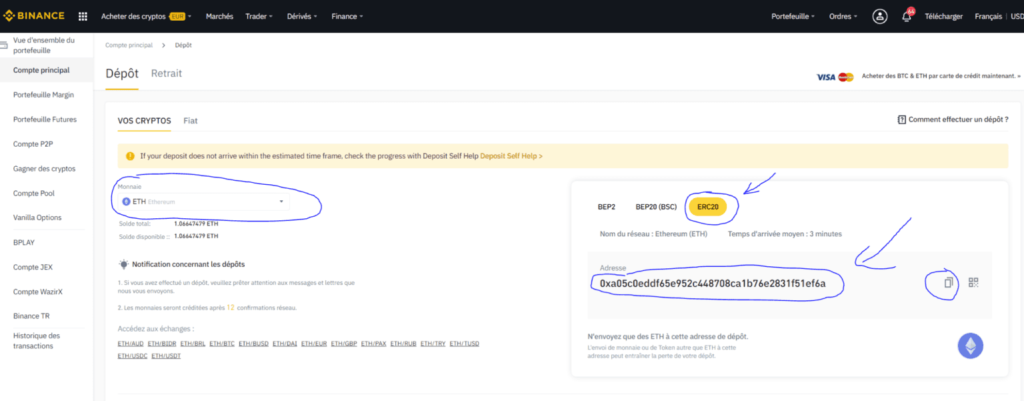
Copy the address provided by your exchange and make sure that you copied it entirely and accurately. If there is any kind of error in the address the transaction will fail, because the address is not yours, and you risk losing your funds forever, so always double-check it!
Now go back to Coinbase and paste the address that you copied, in my case, it looks like this:
All that’s left for you to do is click on “continue” and validate the transaction. My transaction should be processed in a few minutes, the time for Coinbase to prepare batches of transactions for their clients and broadcast them on the Ethereum blockchain. Transactions are not immediate, you can monitor them directly on the Ethereum blockchain by using Etherscan. Here’s an example using my address.
Transfer your crypto assets from an exchange to a Ledger wallet
Throughout this section I will be using my Ledger Nano S, it’s a hardware wallet that costs €60 and secures your cryptocurrencies as long as you want… I like this one because it is the cheapest model from the Ledger brand, which is a brand I trust to store my funds. I’ve been using it personally to store Ethereum that I mined on my graphic cards in 2017 / 2018. French law does not require you to declare your crypto assets which are stored on a hardware or software wallet, so the French government has no knowledge of this information and it’s perfectly legal.
First, install Ledger Live on your computer to start transferring cryptocurrencies from an exchange to your Ledger wallet
You must start by downloading and installing the Ledger LIVE app and setting up your Ledger Nano S so that it can accept receiving payments in Ethereum. In order to do that, connect your Ledger Nano S to your computer by using the USB cable and let the system guide you.
Then, install the Ethereum application on your Ledger Nano S and on Ledger LIVE.
Receive cryptocurrency on your Ledger Nano S wallet
Now we are going to generate a deposit address for our cryptocurrency, Ethereum (ETH), which I chose as an example once again, although the approach is the same for other cryptocurrencies.
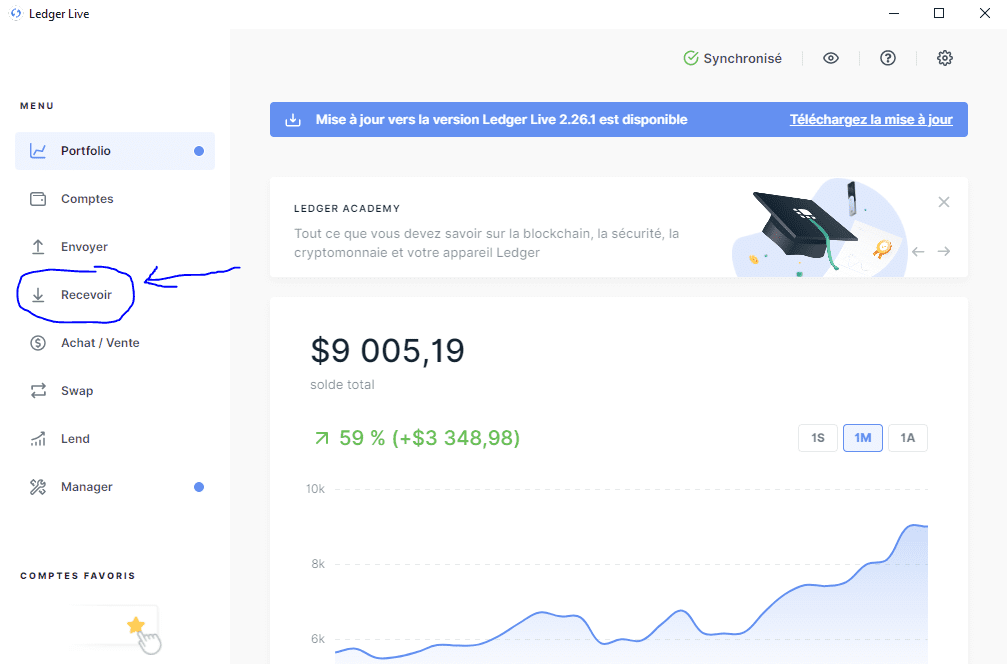
Click on the receive button:
Steps to follow: 1- choose the account you want to credit; 2- connect Ledger to the computer; 3- copy the Ethereum (ERC20) receiving address
Note that your Ethereum (ERC20) address can receive other ERC20 tokens than Ethereum such as USDT or USDC (ERC20), Chainlink, Uniswap, etc. If you have any doubts, you could try to send a small amount first, but be careful, you will pay twice for transaction fees. It may however be wiser to pay a bit more rather than lose it all!
Let’s now go back to Coinbase and paste the address that we copied earlier in Ledger, in my case it shows up like this:
All you have to do is click on “continue” to validate the transaction.
Transfer your Solana (SOL) by using a Google Chrome extension as a wallet
In the same way, it’s possible to transfer Ethereum using a Metamask wallet, you can transfer other crypto assets such as Solana using a wallet directly linked to your web browser. I will take as an example PHANTOM wallet, which is very convenient to use, and Solana because it is an asset operating on a high-performance blockchain with fees under €0,10 per transaction.
The PHANTOM wallet is still in closed beta, but not for long. This wallet works both on the Solana and the Ethereum blockchains (soon for Ethereum, be patient!). This exercise works as well using the SOLLET wallet, but I find it less attractive, and there’s also the fact that SOLLET will not work with Ethereum (ETH).
Configure your PHANTOM / SOLLET wallet
The first thing we’re being asked to do is to note down a list of words, you should do it on a piece of paper or a text file, in a secure location. This list of words is your password giving you access to your wallet, and therefore your funds. If someone knows about it, he can steal your money!
The next thing to do is to choose a password, it’s another layer of security on top of the list of words. It’s not an obligation, but I suggest you do it, really.
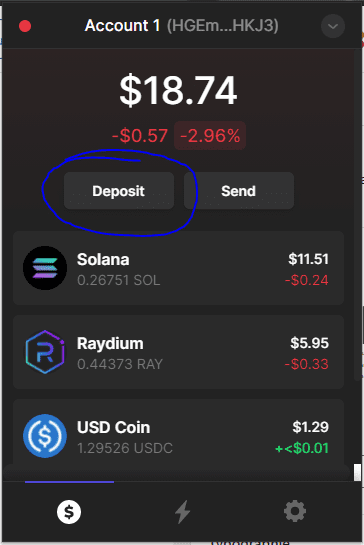
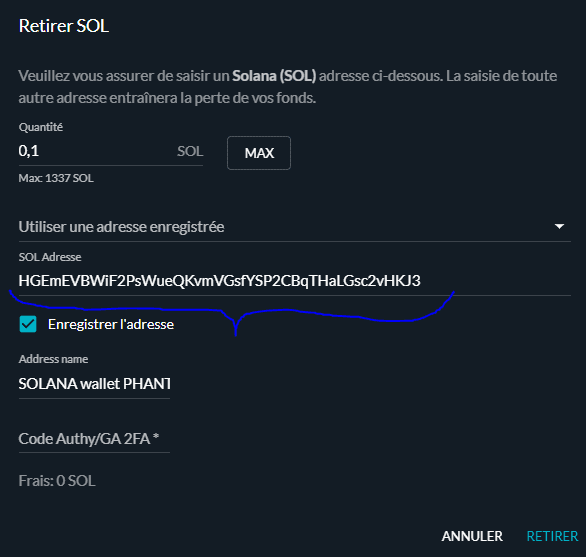
Once everything is ready, in your Phantom wallet, click on the DEPOSIT button to deposit Solana (SOL).
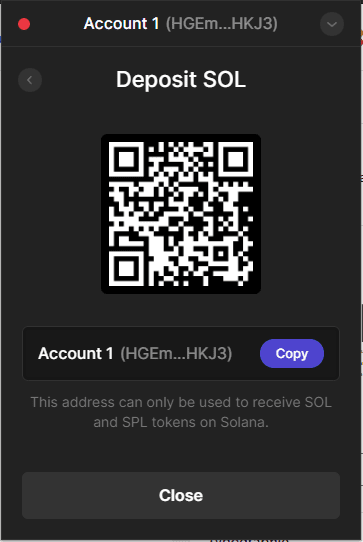
Here, we choose to deposit Solana, and then we copy the Solana address given to us by using the Copy button.

Now we just have to put this address in the address field when withdrawing from an exchange. This time I’ll use the FTX stock exchange because that’s where I bought my Solana (SOL)!
The transaction should be processed in less than 10 seconds, the time to validate a transaction, it’s not immediate, but still better than Ethereum!